
The Library, application in Django 1.8 | Part III
- The Library, application in Django 1.8 | Part I
- The Library, application in Django 1.8 | Part II
- The Library, application in Django 1.8 | Part III
- The Library, application in Django 1.8 | Part IV
- The Library, application in Django 1.8 | Part V
- The Library, application in Django 1.8 | Part VI
- The Library, application in Django 1.8 | Part VII
In today’s entry we will continue with the creation of our application using Django 1.8, in part 2 we stay with the definition of our models, we create our initial database and then we migrate these model definitions, namely: Author, Editor and Book. Today we are going to register our app in the administrative site that Django offers us, to manage our database.
What is Django administrative site?
An application, in short, is that. Django provides us by default with an application called admin, if you are curious you can open your settings.py file and in the INSTALED_APPS variable you will be able to see it along with other apps, its name is django.contrib.admin and it will be very useful for managing very frequent actions in our database.
How can the Django administrative site be useful to us?
Well, you see, when we are developing an application, being able to perform actions on the databases directly in a friendly interface is an advantage, since it saves us a lot of time, which is very valuable in software development. If your background is PHP, you can make a parallel: when you install XAMPP (LAMP or WAMP) and enter the phpmyadmin site you can manage your database from that site, namely: create, update, delete and obtain records. Well, the Django administration site is something similar.
How to use Django administrative site?
We are going to use the administrative site in our Library application, to do this we must follow a series of fairly easy steps:
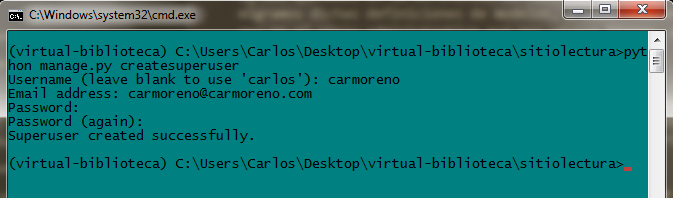
- Create a user: Open the console, go to the
sitiolecturafolder, while there typepython manage.py createsuperuserand complete the corresponding fields: username, email and password.
- Register our models: The next step is to tell Django to register our models in the administration site, for this we go to the folder of our app (
library), we open theadmin.pyfile and place the following:
#library/admin.py
from django.contrib import admin
from models import Editor, Author, Book
# Register your models here.

admin.site.register(Editor)
admin.site.register(Author)
admin.site.register(Book)
First we import the Editor, Author and Book models from the models.py file. And then we register them in the administration site using admin.site.register(<name_model>), where <name_model> is the name of the model to register. You can customize this administration site even more, I leave you the complete documentation in case you want to take a look.
Django admin site in action
With the above, we are ready to see the administration site in all its glory, let’s run the local server (you know python manage.py runserver) and then go to localhost:8000/admin. Once there, a login window will appear; enter the username and password of the user we created previously. Ready, we are inside the administration site!
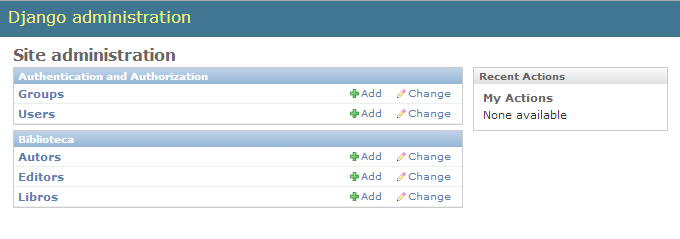
We can observe the models that we have previously registered and we see that it also specifies what applications these models are for. We can also see two other registered models Groups and Users, from the application called Authentication and Authorization, these are registered by Django by default.
Something we see is that our models appear: Authors and Editors instead of Authors and Editors. This is because Django always puts an s to pluralize the model names in its administration site, we can fix this. We go to models.py and inside each class (Author and Editor) we put a subclass named Meta with a special attribute, like this:
#library/models.py
class Editor(models.Model):
	#....
	class Goal:
		verbose_name_plural = 'Publishers'

class Author(models.Model):
	#....
	class Goal:
		verbose_name_plural = 'Authors'
We recharge again and see that the problem will be fixed. I invite you to explore this site, you can create, delete and update Authors, Editors and Books from this friendly interface. It goes without saying that all actions will be reflected in your database (db.sqlite3 or whatever name you have), start by creating Authors and Publishers, then create Books. Django knows by itself that an attribute of your model that is ForeignKey will be translated as a drop-down list and an attribute ManyToMany as a list of options. We can see how powerful and comfortable it is to work with Django. This is all for now, if you have any questions or want to contribute, you can do so below in the comment box. For the next post we will start processing the data, we will play a little with views, urls and templates.
print("See you soon")Translated using GPT 5.3 Codex